Before adapting books and planning literacy materials for students with CVI, please begin by reading;
- Literacy for Children with CVI: Overview and Implications for Different Phases
- Guidelines for Modifying Books for Students in Phase I, II and III
The following books have been adapted for students with Cortical Visual Impairment or CVI. Each student with CVI has different needs and therefore, books developed for each child should be unique. Teachers, parents and caretakers adapting books for this population will need to take into consideration the student’s interests, information they have obtained through records review, Parent/Caretaker Interviews, informal and formal observations as well as information obtained from formal assessments, including (but not limited to) the Functional Vision Evaluation, Learning Media Assessment, Expanded Core Curriculum and finally, most importantly, the CVI Range.


By having a clear understanding of where the child is visually functioning (CVI Range score) and their unique interests, you are better able to design a book that meets their needs.
By sharing these books, I hope to spark ideas of subject matter and literacy presentation that might work well for your student. For example, your student or child might be just beginning to use vision and happens to have a special, favorite target. Instead of using the red mylar gift bag I use in the first example, you could swap that out and use your student’s or child’s favorite target (or a representative bit of the favorite target), on the same black paper pages, with “Page Fluffers”, no print, one target to each viewing page or array.
Should the text of the story be included on the page?
Regarding print, I am often asked about whether to put the story lines on the pages or whether the pages should be left blank. Clearly, having the printed story lines on each page causes increased visual complexity in the array for a student who has CVI, and you will need to look closely at the results of the CVI Range to determine whether your student can tolerate that increased complexity. There are, however, several ways to tell a story, including but not limited to, the following;
- Placing the lines of the story on each page as is traditional; careful using this method with students who visually function in Phase I and early Phase II (See, “Three Bright Red Pom Poms Lined Up in a Row”)
- Placing the lines of the story on each page, but using a Window Card or other Blocking Device to cover the print, until the student can visually attend to both the visual target along with the print. For examples of this strategy, see the sample books, “Clifford’s Family” (the progressive books), as well as “Where is the Red Gift Bag?” and “One Yellow Slinky Bouncing Up and Down”

- Writing the lines of the story on a separate piece of paper and leaving the book pages blank.For an example of this strategy, see the Pegboard Book, “Get Ready for School”
- Attach sentence strips to black Velcro and they can either be placed on the page or removed
- Have a piece of the page that folds down, to cover the print, using Velcro to hold down the flap or to hold it up.For an example of this strategy, see the sample book, “Five Little Lights”

- Place the target or the picture on the right-side page, and place the sentence(s) on the page on the left, so that you can fold the left page back and behind (removing it from the array), if it causes too much complexity
- Make up the story as you present each page, being careful to note the “salient features” (C. Roman-Lantzy) in the same way each time you “read” the book.For an example of this strategy, see the sample book, “My Favorite Things”
Beware of Competing Auditory Input
Just as print on a page may cause increased visual complexity that the student may have difficulty with, the same may be said of the competing auditory input that is created as the story is read or sung. This may be particularly difficult for the child who is visually functioning in Phase I and early Phase II. Students who visually function in Phase I often visually attend best if only one familiar visual target is on the page and there is no competing auditory input to distract (i.e. no story is read) or, salient features are only noted after the child looks at the target (see,“Where is the Red Gift Bag?” for an example of this strategy). Remember that competing environmental sounds and noises may also be difficult for some students who are just beginning to use their vision.
Create your own book to meet the needs of your student
Please note that your student may benefit from an idea I have used in one book I share and another idea I demonstrate in a different book. Feel free to “mix and match” and create your own special book to meet the needs of your students. For example, maybe your student loves silver pie tins, but cannot tolerate more than one target in an array. Rather than using 3 silver pie tins, as I use in my sample book, you could use the story idea of the red, mylar gift bag but switch the gift bag out for a single silver pie tin, attaching it (using Velcro) on each page in a different location. You may not want to put in print because the print may cause too much “visual clutter” in the array for your student. Or, you may want to develop a story about a “happy pie tin” with a happy face drawn in black marker on the center of the pie tin, and on the next page he is a “surprised pie tin” or a “sad pie tin”, etc. Use this idea only if your student can tolerate that much complexity on the target itself. For a better understanding of this idea, see the sample books, “Three Silver Pie Tins and One Red Puff” and, “Where is the Red Gift Bag?”
Keep child’s developmental level in mind
Keep in mind the subject matter of the books you create and the developmental level and/or age of your child or student. The following books discussed were all created for individual students I have worked with who range in age from birth to 5-years and who function developmentally in the same range. Therefore, the subject matter is geared towards young children. Several years ago, I worked with a 12-year-old student who loved Transformers (also called Transformer Robots). I searched and found a book about a Transformer Robot that started off as a red car, but transformed into a red robot (red was this student’s preferred color). I then created a progression of books, like the “Clifford’s Family” books, for this student. Thus, the subject matter was highly motivating for him and more closely matched his developmental level. For a better understanding of this idea, see the sample progressive books for, “Clifford’s Family.”
Create books using the child’s most favorite, familiar targets
I have found that one of the most important factors to look at when creating or modifying books for students with CVI (in addition to knowing where on the CVI Range they are visually functioning) is understanding what favored, familiar target will be motivating for them. Parents are often helpful in giving suggestions, so make sure to ask. I never would have known that my student (who I note above) loved Transformers had I not asked his mother! In this article, I give many examples of targets that I have used in books, and most are very often used with students with CVI (for example the red pom pom and the yellow slinky). But it will be crucial for you to determine what it is that YOUR child or student likes to look at and then decide whether you can create a book using that target (or a representative bit of that target) or modify an existing book.
Use hand-under-hand guidance, as necessary
When tactual guidance is needed to turn a page or explore a target, remember to try to use hand under hand guidance and encourage the entire early intervention team to use hand under hand guidance as well. As noted at the website for the Georgia Sensory Assistance Project, “Using a hand-under-hand approach, instead of hand-OVER-hand, has been demonstrated to be a far superior way to encourage children to learn with their hands. Instead of moving the child’s hands through actions, the adult’s hands lightly touch beside the child’s or the child’s hands ride on the adult’s hands and feel what the adult hands are doing. In hand-under-hand touching the child and adult explore together, are interested in the object together. The child is invited to feel, not forced or heavily manipulated. Hand-under hand: is non-controlling. lets the child to know how you are touching the same object or what movements your hands make to do a task, and does not keep the child from experiencing the object because he is so aware of your hands controlling his.”
The following are a few examples of books created for students I have worked with:
- “Where is the Red Gift Bag”
- “Getting Ready for School”
- “One Yellow Slinky Bouncing Up and Down”
- “Three Silver Pie Tins and One Red Puff”
- “Three Bright Red Pom Poms Lined Up in a Row”
- “Five Little Lights”
- “My Favorite Things”
- “Clifford’s Family” (a progressive, modified set of books)
Scroll down to see how to make each of these books
1. “Where is the Red Gift Bag?”
The book, “Where is the Red Gift Bag?” was developed for a student who was just beginning to use vision (Phase I on the CVI Range). During the Parent Interview, prior to evaluating this child, her perceptive mother noted that the only target she looked at was a red mylar gift bag. It has been my experience that parents are usually very accurate in their reporting of what their child will look at and indeed, this child did visually attend to a red mylar-like gift bag (it was the only target this child initially glanced at). Because it was the holiday season and the mother wanted gift ideas, I helped to make this book for her child.
Because this child had a long latency period and needed a strictly controlled environment, we did not punch or bind the pages. We wanted to present each page individually, one at a time, and give plenty of wait time so the child could respond. We also wanted to lift the pages up, bringing them into the child’s field of view. To do this, we used an All-In-One Board (black, Velcro compatible side) and placed Velcro on the back of each page, so that each page would “stick” to the All-In-One Board. By presenting individual pages on the Board, we could position the materials in her best field of view and bring the board close, within 18 inches of her face.
This child also benefited from movement, which was provided in part by the reflective quality of the red mylar, in addition to the physical movement of the bag itself. Keeping the bag separate from the page, we used Velcro again (on the page and on the back side of the bag), and as the story was told, we brought the bag in from the child’s preferred side, slowly moving it into position and attaching it onto the designated spot on the page.

The story is about a Little Red Mylar Gift Bag that is “above”, “below”, “to the right”, “to the left” and “on” a line. Although these positional concepts were more advanced than the developmental level of this child, her goals when using this book were to visually locate the target and track its movement to the location on the page (not understand the positional words). Wording and concepts can be adjusted for individual needs.
In addition, because competing auditory input was distracting for this child as she attempted to use her vision, we first presented the gift bag/target (separated from the page) in her near, preferred visual field, then slowly moved it into position and attached it to the page. Once the child glanced at or looked at the target, we THEN said, “You are looking at the red, rectangular shaped bag with the tag. It is under the yellow line”. Part of the story line, or script, for each page always noted 2 to 3 salient features or visual qualities that described the red mylar gift bag.

Occasionally, we found that this child needed a “jump start” to begin using her vision. When this happened, we often used “SpotLIGHTing Techniques” and spotlighted the mylar gift bag with a high lumen flashlight (300 to 1,000 lumens or >), being careful that we did not create glare or a harsh reflection.
It should be noted that there is print on each page and when we first started using this book with the student, we needed to use Blocking Techniques (which helped to reduce the “visual clutter” in the array). We used a large sheet of heavy black paper to cover the wording, until the student could tolerate having the positional word/word strips on each page, in addition to the gift bag.

We later purchased many red mylar gift bags, cut them apart and attached strips and pieces to other targets we hoped this student would look at. For example, by attaching a strip of the reflective paper around her cup, she was more motivated to search for it.
Materials:
-
Red Mylar Gift Bags (I use 4” X 6” size); these often come in a set of 3 at The Dollar Store
-
Red chenille stems or pipe cleaners OR strip of yellow paper
-
For a full list of materials, see General Materials Used to Adapt Books for Children with CVI
2. “Getting Ready for School”
(Pegboard Book adapted for CVI/DeafBlind)
This book was modeled after the “Pegboard Books” created by Patty Obrzut, Assistant Director at the Penrickton Center for the Blind. Her original version can be found at;
http://activelearningspace.org/things-you-can-make/books
In addition, an alternate version can be found at:
http://www.pathstoliteracy.org/strategies/pegboard-books-our-earliest-readers
This “CVI Friendly” version of a “Pegboard Book” was created, in part, with the work of Dr. Lilli Nielsen and her Active Learning approach in mind. It also incorporates some Activity Calendar ideas.
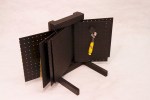
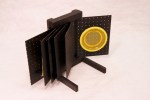
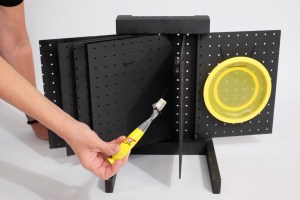
It is made from 1/8th inch thick pegboard, spray painted a flat black. The “pages” in this version are 9”X12” and are relatively lightweight and easy to turn. The “spine” and “binding” are also spray painted black so that each page acts as a Window Card or occluder, making each mounted target stand out. It is important to note that for photographic purposes and for the viewer to see how this is made, the photographs were taken with the book in front of a white background, which makes the pegboard holes stand out. When using this book with a student, the book should sit on a black table or black mat and an Invisiboard should be set up behind the book to eliminate the visual distractions of the holes.
In this book, real, familiar objects are attached with black elastic, so that the objects can be pulled by the student, manipulated and explored, but then they pop back to the page for later use. On the page with the light up toothbrush, a black retractable badge holder is used. The toothbrush can easily be pulled forward, explored (orally, if desired) and then when it is released, it pops back to the page. The base of the Pegboard book has sturdy “legs” which extend outward towards the student, to keep the book in one spot when the pages are turned forcefully or roughly. Additional clamps can be added behind the book to further stabilize it, if needed.
This book was made following a “Get Ready for School” routine, which a young student uses. This student visually functions in Phase II on the CVI Range. His preferences helped to guide us, in part, in choosing each of the interesting, tactile and auditory materials, each representing what he does in the morning. In other words, the materials in his book all have meaning to him; they are not random objects. Before attaching the materials in the book, this student had lots of time to explore the individual materials as we discussed the salient features of each of the items.


Key elements of this “CVI Friendly” Pegboard Book and the specific objects chosen include;
- Using the student’s favorite, preferred color; yellow
- Incorporating the student’s favorite, familiar household objects
- Incorporating elements of light
- Incorporating objects or materials which have movement qualities and/or reflective qualities
- Ability to position the entire Pegboard Book so that it is presented in the best visual field for the student
- The pages stand upright, bringing the objects into the student’s lateral field of view (note; many students with CVI have lower visual field difficulties)
- There is only one target or object on a page, and pages are NOT used on their back side, which helps to reduce complexity in the array
- Ability to bring the Pegboard Book close to the student, within 18 inches
- If the student can reach and grasp the target or object, they can bring it even closer to their face because of the elastic attachments (or retractable badge card reel). Once released, it will pop back into place for later exploration and be exactly where they left it.

It will be important to set up an Invisiboard (or other similar black backdrop) behind the Pegboard Book, to eliminate distant “visual clutter” which might interfere with looking toward/at the Pegboard Book. This also has the added benefit, as noted above, of making the holes in the pegboard “disappear”.

The story lines for this book are on a separate sheet of paper. Because this book was made for a child who loves music and specific tunes, this story was sung to the tune of, “These are a Few of my Favorite Things”. As is noted above, some students may not be able to tolerate the competing auditory input while using vision; another reason to look closely at the results of the CVI Range before creating your own books.
The song/story that goes with my Pegboard Book is as follows;
Get Ready for School
(To the Tune of, “These are a Few of My Favorite Things”)
Yellow puff peepers
And buttons on jackets,
Round shiny mirrors
And combs that say, “Clackett”,
Lights on a toothbrush
And circle shaped plates,
Get ready for school
It’s so very great!

Materials:
- Black, round elastic
- Black retractable badge holder
- 1/4th inch thick pegboard
- 2” X 2” hardwood board
- 1” X 2” hardwood board
- ½” doweling, 3 feet
- Active Learning materials to put on the pages
- A very complete Tutorial on how to make and assemble this book can be found in the DIY section of my website at strategytosee.com
3. “One Yellow Slinky Bouncing Up and Down”
This book was developed for a student who visually functioned at the low end of Phase II.
Although the student could tolerate more than 1 target on a page, we found that we needed to “take a step back” and use Blocking Techniques, covering the wording at first.
We also found that it benefited the student if we grasped the end of the Slinky, pulled it outward, and showed the movement qualities of it, as we told the story.

This student was just beginning to reach out and touch targets and this book worked well because the slightest of touch of the page or Slinky created some movement of the Slinky, particularly since we presented the book against an angled, All-In-One Board (rather than flat on the surface of the table).
It should be noted that the most favorite, familiar target for this student was an illuminated, yellow Slinky (see DIY section at strategytosee.com for how to create an illumi-Spring like his).

Much time was spent, prior to presenting this book, on visually locating and watching the movement of this student’s illuminated Slinky. We also discussed the illuminated Slinky’s salient features.


Materials:
- Yellow Slinky Jr., by Poof; cut one Slinky apart into smaller sections (I made mine into 6 smaller sections)
4. “Three Silver Pie Tins and One Red Puff”
One of my students, who also visually functions at the lower end of Phase II on the CVI Range, loved to look at reflective, silver pie tins. This was indeed his favorite, most preferred visual target. Therefore, we decided to create a book around miniature silver pie tins. This student also alerted well and consistently to the color red, so we incorporated a bit of red into the story as well. This student could tolerate up to 3, well-spaced targets in an array, so we decided to use no more than 3 pie tins on a page.


Prior to presenting this book, each time this student played with his reflective pie tin, we discussed the 3 salient features that were the defining elements of his favorite target. The script we decided on was, “The pie tin is silver, is reflective and has a ridged edge.”
The story in this book is about a pesky, red ball who moved around to different spots on each page. While we used descriptive wording like, “The red ball is IN the center pie tin”, the goal was for the student to demonstrate that he could visually locate the ball on each page. An added benefit was that he was exposed to a variety of directional words and vocabulary. He loved this book and the activity and clearly thought it was fun. As discussed in the introductory information, the motivation factor is incredibly important.
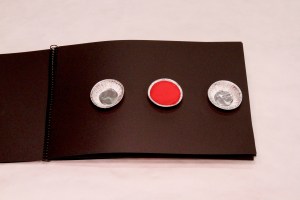
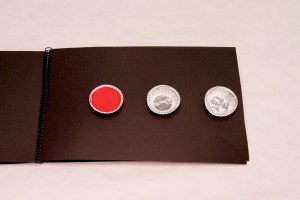
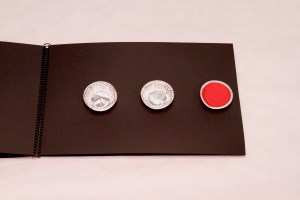
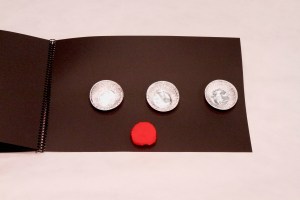
Note: Since this book has bulky 3D visual targets in it, it is easier to punch the holes in the blank pages and put on the binding (creating a blank book), before you glue on the visual targets.
Materials:
-
Disposable 3” Aluminum Foil Tart/Pie Pans Mold; these can be ordered on Amazon and come in a package of 250 pieces
-
Red Puff Balls, use 1” or 2” size; these are often called “Pom Poms” at the craft stores, but should not be confused with the mylar cheerleader-like pom poms used in “Three Bright Red Pom Poms Lined Up in a Row”
5. “Three Bright Red Pom Poms Lined Up in a Row”
Brightly colored mylar pom poms have long been a favorite visual target of students with CVI. Students who visually function in Phase I and even into Phase II respond well to them and often look very consistently at them. They come in bright, colorful colors, are often made of mylar reflective material and they are lightweight and easy for small fingers to grab (Note; watch carefully, pom poms are not child safe!).
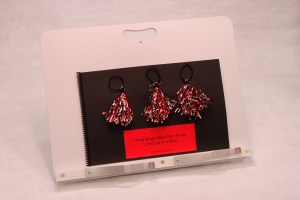

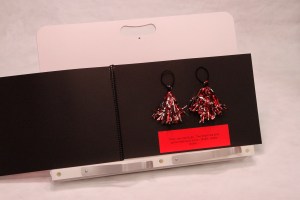
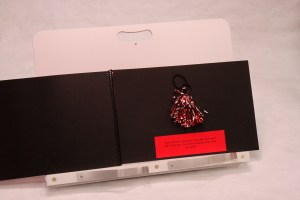
Because this book has 3 well-spaced targets on each page, the student would need to be able to tolerate more than 1 target in an array (high Phase I or into Phase II). If the print on the red paper makes the array too complex, it can be easily covered using Blocking Techniques.
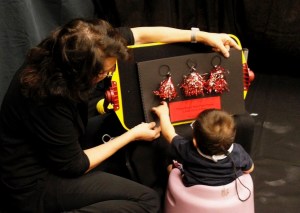
It is easy to make miniature mylar pom poms by breaking apart a full sized Pom Pom and cutting shorter lengths of the mylar strands, binding them into bundles and creating a smaller version of the student’s favored target. In this book pictured, I used a combination of red and silver strands, but it can easily be created with all red or all yellow, or any color that is preferred by the child. Any slight movement of the page causes movement of the light weight individual strands of mylar and the reflective quality of the Mylar also draws visual attention.
Materials:
-
Red inexpensive mylar pom poms that can be taken apart and modified in size; you can often find these at the Dollar Store or you can cut apart and modify a metallic red foil fringe curtain/doorway to create mini pom poms (find at Amazon)
-
Scrunchy pony tail holders, to bind and create the mini pom poms (2 per pom pom)
-
For a full list of materials, see General Materials Used to Adapt Books for Children with CVI
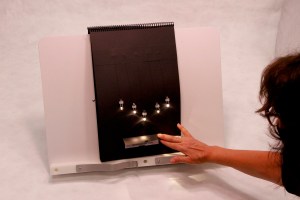
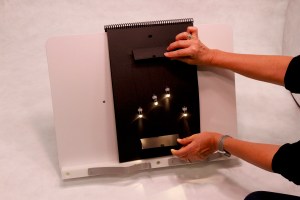
6. “Five Little Lights”

My book, “Five Little Lights” was created for a student who visually functions in Phase II and who attends well to lighted targets or targets that are back lit. I present this book on a large book stand so that the book can stand upright. For photographic purposes, a white book stand was used in the photos, but it is recommended that you use a black book stand with a black Invisiboard behind, which will reduce the environmental visual complexity and/or visual complexity in the array. I also often turn down the room lights, so that the target lights in this book stand out more clearly.


The individual lights used in this book come in a packet of 30 from Leorx and are called Leorx LED Party Lights (see, Materials Used for Adapting Books and Literacy for Students with CVI and the strategytosee website under Recommended Products). Alternately, you can use Finger Lights. These Leorx Lights used above, can be twisted on or off, as needed. I suspended the lights from heavy black, threads and carefully spaced them apart from one another.
Because my student initially had difficulty with too much “visual clutter” on a page, I covered the print with little fold down tabs.
There is Velcro attached to the tabs, so they can either be held open or closed.

When the student became very familiar with this book and was better at using his vision, we turned the tabs upward and exposed the print.
Five Little Lights
(To the tune of, “Ten Little Monkeys Jumping on a Bed”)
Five little lights,
glowing in the night.
One fell down,
now it’s not so bright.
Four little lights,
glowing in the night.
One fell down,
now it’s not so bright.
Three little lights,
glowing in the night.
One fell down,
now it’s not so bright.
Two little lights,
glowing in the night.
One fell down,
now it’s not so bright.
One little light,
left glowing in the night.
Don’t fall down!
Hold on tight!
Materials:
- Leorx LED Party Lights or LED Finger Lights, at least 20
- Heavy black string
- White cardstock
- Black cardstock
- For a full list of materials and how to make this book, see General Materials Used to Adapt Books for Children with CVI
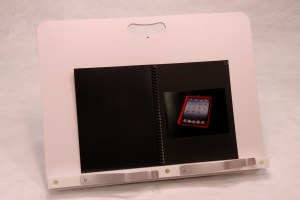
7. “My Favorite Things”
I have created many, many books in a similar fashion as the following pictured book, “My Favorite Things”.
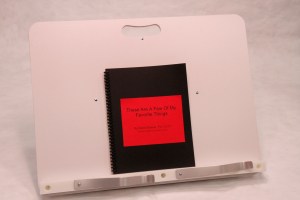
Students with CVI often have a difficult time with pictures or 2D representations of 3D items. Look carefully at the results of the Functional Vision Evaluation and the CVI Range and make certain your child or student is ready to use 2D pictures. It has been my experience that most students need to be well into Phase II, visually functioning at approximately 6 on the CVI Range, before they begin to interpret and understand 2D representations or pictures.
The use of abstract color illustrations, black and white line drawings and color symbols seem to be especially difficult for students with CVI (this has also been supported in limited informal observations by other TVIs). Students may alert to or visually attend to a bright color found as part of an image, but often do not understand what the image represents. In addition, the complexity created due to the multiple colors or lines found on most images, causes many children to look away and “tune it out”.
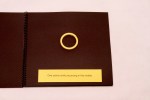
I often have the most success with this transitional process (moving from a 3D target to a 2D image) if I take a color photograph of my student’s favorite, familiar target(s). I try hard to make sure the image is very sharp and the target is photographed against a black background to make the image of the target really stand out. I print 5” X 7” photographs in a matte finish, which produces less glare. I then mount the photographs, one to a page, using heavy, black card stock for the pages.

I begin helping the student make the transition from their favored, familiar 3D target to the 2D image by showing the student the photo, encouraging them to touch the photo (if able) and then giving them the 3D target. I also present individual photos on an iPad using either Keynote or Pictello.
Several years ago, one of my student’s parent was working on this process. She had her child’s favorite ball (an Oball) presented as a photo on her iPad, which was in her son’s field of view. Her son saw the image, crawled to the iPad and reached out to grab the ball, thinking it was the real thing. The perceptive mother quickly gave him his real, 3D Oball and said, “I see you want your Oball”. This began the process of this child learning about 2D images.
To make these books, place only one photo on the right-side page (no back to back images). Because transitioning from 3D to 2D is often a difficult process for students with CVI, I try to keep the array as simple as possible. While a white reading stand was used in the following images for photographic purposes (to show the size of the book and to make the book stand out), use of a black reading stand, and an Invisiboard behind the reading stand, is recommended.


This type of book provides the perfect opportunity to discuss the salient features of each target. Because there may be several different people who “read” this book to the child each day, it is important that there is a script, so that the same descriptive words are used to describe each target. A script for this book might look like this;
- This red slinky has coiling, continuous circles and lights up.
- This lighted spoon is red and yellow, has one pointed end and a bowl-shaped tip.
- Clifford is red, has a black heart-shaped nose and wears a red, reflective bow around his neck as a collar.
- This toothbrush is red, lights up and has short white bristles on one end with a suction cup on the other end.
- This iPad has a red frame around it. There is a round, black button at the bottom of the frame.
- This Oball is round and has a clear tube running down the center with small balls inside the tube.
The key idea to remember when helping a child with CVI transition to 2D images is to begin by using the child’s favorite, VERY familiar targets that he/she has had lots of experience with.
Materials:
- Photos of child’s familiar, favorite targets
- For a full list of materials and how to make this book, see General Materials Used to Adapt Books for Children with CVI
8. “Clifford’s Family” (a progressive, modified set of books)
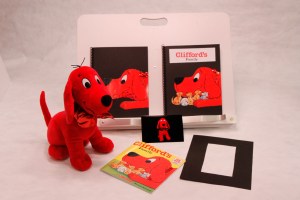
I often advise parents to plan ahead as they work with their child to encourage more consistent and efficient use of vision. For example, if the child has a specific familiar, favored target that he loves when he is just beginning to use vision in Phase I, I encourage parents to think about how that target might be used later, especially when introducing literacy.
One of my students loved his bright, red Clifford stuffed dog and had several of these stuffed dogs in different sizes. He alerted well to red and we often used Clifford as a “warm up” target to get him looking and using vision. We decided early on to tie a red, mylar ribbon around Clifford’s neck (a collar), and often encouraged this student to touch and crinkle the ribbon (the use of the ribbon was the “planning ahead” part). We often used descriptive words for the ribbon, which was one of the salient features for this child’s Clifford.

As this student made progress along the CVI Range, we began to use color photos of his favorite targets, including one of Clifford.

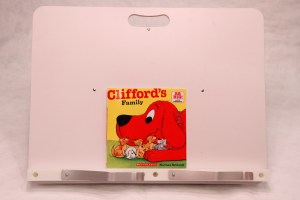
After this student could demonstrate an understanding that the 2D photo of Clifford represented his favorite toy, he was visually functioning in Phase III. At that point, we purchased 3 of the same book about Clifford (“Clifford’s Family”).

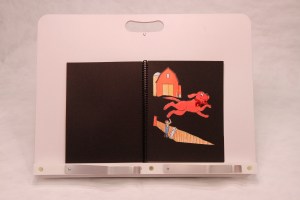
I then took one of the 3 books, and started to cut it apart, mainly focusing on cutting out Clifford only. I created a book about Clifford doing various things with little or no extra details. In each picture of Clifford, I glued on a red, mylar, ribbon-like “collar”, using the same ribbon that my student was familiar with.


As we showed him each page of this Level 1 book, he was encouraged to look for the red mylar “collar” on Clifford.
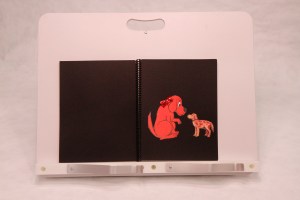
Once he became consistent at visually locating the red mylar “collar” and Clifford, we moved on to the Level 2 book of this series. For Level 2, we cut up the second book we purchased and not only cut out all the pictures of Clifford, but we also included more detail on each page along with Clifford. As with the Level 1 book, in Level 2 we also used additional red mylar ribbon as a “collar” on each of the Clifford dogs.


After much practice, my student became very good at visually locating Clifford on each page (in part because of the red mylar ribbon/collar) and could also view these Level 2 pages at the same time the story was being told. At this point, we finally introduced the third (original) book. This one was not cut up!
When we started using the original book, there was still too much “visual clutter” on each page. We found that if we used a Window Marker, made from heavy, black tag board, it helped the student to visually locate Clifford.

Blocking Techniques were also used.

As the student’s use of vision improved and his ability to scan and locate Clifford became more consistent, the Window Markers and Blocking Materials were minimized and then entirely withdrawn.
Materials:
- Three copies of a book with the student’s favorite character or target in it
- Heavy, black card stock for making pages of blank books and Window Cards
- Brightly colored ribbon, in student’s preferred color, for highlighting
- For a full list of materials and how to make this book, see General Materials Used to Adapt Books for Children with CVI
