Before reading this post, begin by reading:
- Literacy for Children with CVI: Overview and Implications for Different Phases
- Guidelines for Modifying Books for Students in Phases I, II and III
- Adapting Books and Literacy for Students with CVI
The materials noted in this article refer to the Adapted Books I created and shared in “Adapting Books and Literacy for Students with CVI”.
For the pages used in the books I create, I prefer a flat, black, heavy weight paper. Several types of paper for pages are noted below. I use black because it acts as an “occluder” (C. Roman-Lantzy) or Window Card and makes the visual object, target or picture really stand out or, “POP”. In addition, I often recommend that the black paged book be presented against a black book stand, black Invisiboard or black table covering. This helps to “hide” any visual clutter (complexity) in the array and/or environment. This is especially helpful for students who visually function in Phase I and Phase II. Occasionally, for a student who is challenged with new visual tasks in Phase III (i.e. a new book with multiple targets and/or pictures), it can also make a positive difference to “take a step back” and use black pages, until the visual task becomes easier.
- 11 X 17 inch flat, black heavy weight paper (I use Neenah, 80 lb. Astrobrights Cover Eclipse Black)
- 8.5 X 11 inch flat, black heavy weight paper (I use Neenah, 80 lb. Astrobrights Cover Eclipse Black)
- Tru Bind Small Office Binding Machine (TB-S20A)
- Tru Bind Black Coil Bindings 3/8”
- Tru Bind Black Coil Bindings 9/16”
- Coil Cutting and Crimping Tool (Watch the You Tube Video noted below for how to use the Crimping Tool!)
- How to Use Coil Crimping Pliers for Spiral Coil Binding https://www.youtube.com/watch?v=5Rg2AoL7OSU
- Pro-Click Covers; rather than the Neenah paper noted above, I have also used these covers as “pages”, using the flat, black side of the cover, not the shiny side.
- Pro-Click Spines; these spines go along with the Covers above, and can be clicked open and closed, again and again, for easy removal of just one page or two pages to present.
- Clear, round, self-adhesive rubber pad bumpers, to use as “Page Fluffers”. These are attached to the upper right corner of each page and help to separate the pages for small fingers to easily grasp and turn. Alternately, one could use black, small pom poms; the type sold in multiple colors at the craft stores (not to be confused with a large, hand-held cheerleader pom pom). These would need to be glued onto the upper right corner of each page and help to separate the pages.
- Variety of adhesives, including (but not limited to); glue stick, glue gun, 3M Scotch-Weld Instant Adhesive, Velcro, Contact Strips and Stick-it Dots.
- Medium Binder Clips
- Window Markers are simply a black “frame”. I usually use an 8.5X11 inch piece of heavy, black paper, then cut out a rectangle, just a tad larger than the target I want to “frame”. For example, if I am showing the book, “Clifford’s Family” to a student, but I want to block out all the “visual clutter” in the picture except Clifford, I would cut a rectangle the size of Clifford, so that the other “visual clutter” is hidden by the “frame”. The frame acts as an occluder.
- Black clothes pins with Velcro on one edge for attaching to an Invisiboard or All-In-One Board, to hang individual pages from. Use a flat, black spray paint on natural wood colored clothes pins. When the clothes pins are spray painted black and stuck to the board, they “disappear” into the black background and do not cause additional “visual clutter”.
- All-in-One Board and/or Invisiboard (available through APH).
Materials to Create Specific Books
In addition to the above general materials, you will need the below, specific materials to create the indicated books
“Where is the Red Mylar Gift Bag?”
- Red Mylar Gift Bags (I use 4” X 6” size); these often come in a set of 3 at The Dollar Store
- Red chenille stems or pipe cleaners OR strips of yellow paper

“Three Silver Pie Tins and One Red Puff”
- Disposable 3” Aluminum Foil Tart/Pie Pans Mold; these can be ordered on Amazon and come in a package of 250 pieces
- Red Puff Balls, use 1” or 2” size; these are often called “Pom Poms” at the craft stores, but should not be confused with the mylar cheerleader-like pom poms used in the following book and noted below.

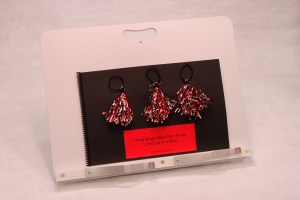
“Three Bright Red Pom Poms Lined Up in a Row”
- Red inexpensive mylar pom poms that can be taken apart and modified in size; you can often find these at the Dollar Store or you can cut apart and modify a metallic red foil fringe curtain/doorway to create mini pom poms (find at Amazon)
- Scrunchy pony tail holders, to bind and create the mini pom poms (2 per pom pom)
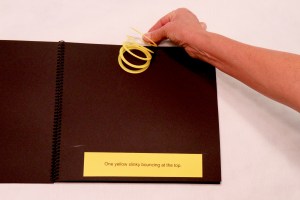
“One Yellow Slinky Bouncing Up and Down”
- Yellow Slinky Jr., by Poof; cut one Slinky apart into smaller sections (I made mine into 7 smaller sections)
“Five Little Lights”
- Leorx LED Party Lights; these are small, LED lights which are designed to go in paper lanterns, can be ordered from Amazon and come in a package of 30. Note: I often place one or more of these inside of a balloon to light it up!
- ALTERNATELY, you can use LED Finger Lights. The advantage of using the Finger Lights is the color; they come in either red, green, blue or white. They can be ordered from Amazon as well and often come in a package of 10 to 40.

“My Favorite Things”
- Five to ten, 5” X 7” matte finish, color photographs of your child’s/student’s favorite toys or objects. This might include favorite toys such as an O’Ball, or an Elmo doll, or it might include objects he/she encounters during familiar routines such as a meal (favorite cup or lighted spoon)

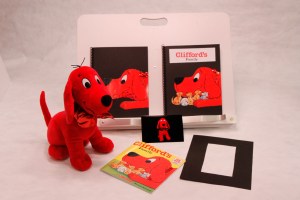
Modified, progressive version of, “Clifford’s Family”
- Clifford’s Family, by Norman Bridwell, paperback version available on Amazon (Note: you will need 3 copies of the same book to make the modified, progressive version I show in the sample)
- Red, mylar-like ribbon and glittery craft tape, to highlight Clifford’s collar; it will be used both as a salient feature and to draw visual attention
- Black Window Marker; see above for how to make
“Get Ready for School” (A Pegboard Book)
Pegboard Book:
- Black, round elastic
- Black retractable badge holder
- 1/8th inch thick pegboard
- 2” X 2” hardwood board
- 1” X 2” hardwood board
- ½” doweling, 3 feet
- Flat, black spray paint
- Active Learning materials to put on the pages
- A very complete Tutorial on how to make and assemble this book can be found in the DIY section of this website.

For additional suggestions, see also, Materials for Literacy, under the pull down window, Literacy, at this website.
