Tips, Tricks, Modifications and Strategies
Phase II: Simple Puzzles
April 26, 2020
Creating materials for students with CVI is always fun for me and I often wish I had more time to be creative. During these days of self-quarantine, I finally have some time to create all of the materials and books that have been on my, “To Do” list. I will be posting photos of materials, along with tips, tricks, modifications and strategies regarding materials created in the hope that you too will try your hand at making some unique, child-specific materials for your student or child. When appropriate, I will offer templates and other materials for you to use, to complete the project as well.
For this post, I will be sharing my interpretation of an idea from the blog titled, “While You Are Home: Activities for Children With CVI” by Dr. Christine Roman. In the blog, Dr. Roman discusses the use of simple puzzles of 2-3 pieces (more pieces if Phase III) made from pictures. You are encouraged to read Dr. Roman’s blog first, so you will better understand how this activity might be used. You can access this blog at Dr. Roman’s website cviresources and at Paths to Literacy;
http://cviresources.com/while-you-are-home/
https://www.pathstoliteracy.org/blog/while-you-are-home-activities-children-cvi
What you will need to create this activity:
- iPad or other tablet technology
- Student’s real, 3D favorite, familiar object
- Exact, realistic color photograph of the student’s favorite, familiar object (a hard copy)
- Office Depot Shipping Labels (8 ½ X 11 inches), or other premium full sheet shipping label https://amzn.to/2VpNVIf *affiliate income
- Avery Printable Magnetic sheets (8 ½ X 11 inches) https://amzn.to/3eFJGA5 *affiliate income
- All-In-One Board or other small magnetic dry erase white board https://amzn.to/3bnc4F3 *affiliate income
To create this activity, you will need to begin by determining what the student’s favorite familiar targets or objects are. Then, take a crisp, clear photo of that target. Print a hard copy of that photo and download the image onto an iPad or other tablet. I often simply place the photo in my iPad’s photos or if I will be working with several photos, I use Keynote or PowerPoint. Next, print off another color hard copy of the photo, enlarged to about 6” X 8”, but use an 8.5” X 11” shipping label to print it on. Peel the back off of the label and affix it to a magnetic sheet. Then, cut the picture into 2 or 3 pieces to make the puzzle.
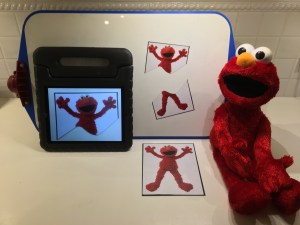
Pictured below, a 3D favorite toy (Elmo), a hard copy of a photograph of Elmo, a simple puzzle of 2 pieces of Elmo, and an iPad showing a single piece of the puzzle. The magnetic puzzle pieces are affixed to an APH All-In-One Board.
For students who can tolerate greater complexity (high Phase II or into Phase III), you might create a puzzle with more pieces. You can download a puzzle template and transfer the pattern to the back of the magnetic sheet then cut out the pieces.
The next 2 pictures below show a 3D favorite toy (Elmo), a hard copy of a photograph of Elmo, a more complex puzzle of 6 pieces, and an iPad showing a single piece of the puzzle. The magnetic puzzle pieces are affixed to an APH All-In-One Board.


