Tips, Tricks, Modifications and Strategies
Phase III: Orientation and Mobility Using the iPad, a sample lesson
May 17, 2020
To see the sample lesson I created using an iPad, see the preview below;
Tips, Tricks, Modifications and Strategies
Phase III: Orientation and Mobility Using the iPad, a sample lesson
May 17, 2020
To see the sample lesson I created using an iPad, see the preview below;
Tips, Tricks, Modifications and Strategies
Phase III: Orientation and Mobility Lesson in a Familiar Area
May 15, 2020
Creating materials for students with CVI is always fun for me and I often wish I had more time to be creative. During these days of social distancing, I finally have some time to create all of the materials and books that have been on my, “To Do” list. I will be posting photos of materials, along with tips, tricks, modifications and strategies regarding materials created in the hope that you too will try your hand at making some unique, child-specific materials for your student or child. When appropriate, I will offer templates and other materials for you to use, to complete the project as well.
For this post, I will be sharing my interpretation of an idea Dr. Christine Roman-Lantzy recently shared. While discussing ideas for materials to use during Orientation and Mobility lessons, Dr. Roman suggested use of a representative “map” of a familiar area, such as the student’s front yard, house, driveway and backyard, to teach concepts such as moving along a route, demonstrating understanding of “right” and “left”, “in front of”, “in back of” and the ability to visually travel by (and visually process) landmarks. For more information on Orientation and Mobility for students with CVI, you are encouraged to attend the TSBVI Coffee Hour on May 27 at 10:00 AM CT or read Chapter 6 in Cortical Visual Impairment: Advanced Principles, by Dr. Christine Roman-Lantzy, APH Press (2018).
What you will need to create this O&M map/activity:
To create this Orientation and Mobility “map”, you will need to begin by choosing a location that is not only familiar to your student but also a location that you want to teach your student orientation and mobility lessons around. This might be his or her familiar front yard and backyard, a school setting or a familiar park. Once the area is determined, pick out several familiar landmarks at this location. You will recreate these familiar landmarks by either using a crisp, clear photograph of them (cut out and mounted on heavy card stock) or you will use symbols or icons which represent the landmarks. Having a clear understanding of your student’s CVI Range score will help to determine how you represent the landmarks and routes, as well as how many icons or symbols you use in the array.

Above, LED Light Box Tracer turned on. Silhouettes of house and garage clearly shown as well as the “window cling” shapes (icons).

Above, LED Light Box Tracer turned off. Photographic images of house and garage clearly shown and salient features can be discussed. The “window cling” shapes (icons) still stand out due to their bright colors.
For my example above, the high Phase II student I plan to use this with needs color photographs of his familiar home and garage, but I’ve used symbols (or icons) to represent landmarks that are in his side yard and backyard. For these icons, I have chosen to use “window clings” because they really show up when backlit and they really do “cling” to the surface of the map.
The icons represent the following;
Green joined “shamrocks” = 3 tall Italian Cypress trees which are on the left side of the driveway, lining it
Red, long rectangular or pole shape = Basketball hoop and stand which is on the right side of the garage in the far backyard
Blue round ball = circular trampoline which is on the far-right side of the backyard
As noted above, I’ve used an LED Light Box Tracer to illuminate my transparent “map”. Since my student has difficulty with visual fatigue, he often benefits from backlighting. In addition, he still has some challenges with complexity. Therefore, I have started out with only 3 icons, along with the 2 familiar photographs, to limit the complexity of the array. More icons representing landmarks can be added as he demonstrates an understanding and visual processing of the original icons/landmarks. Later, as he moves into Phase III, the different icons can be switched out for identical icons (such as all small red squares). By identifying what each icon represents, he will be demonstrating that he understands that icon’s location (and thus, what it is) in relation to other landmarks and objects in his yard.
I printed my photographs of the house and garage on Label Paper using my color printer. Once they were affixed to heavy card stock, I carefully cut out their shapes and affixed them to my map with double stick tape. I used narrow, black electrician’s tape to create the route to get from the front yard and driveway to the backyard.
Since my student especially has difficulty visually locating the basketball pole and hoop, we will work on discussing the salient features of this landmark, including the pointing out the red hoop. I have a photograph of the basketball hoop and stand on my iPad and my student can zoom in to look at each specific salient feature.

Please note: One or more of the links noted on this blog are affiliate links. This simply means that if you click on a link and make a purchase, I may receive a small commission at NO EXTRA cost to you. As an Amazon Affiliate, I earn from qualifying purchases.
Tips, Tricks, Modifications and Strategies
Phase II: Visual Journal/Days of the Week
May 9, 2020
Creating materials for students with CVI is always fun for me and I often wish I had more time to be creative. During these days of self-quarantine, I finally have some time to create all of the materials and books that have been on my, “To Do” list. I will be posting photos of materials, along with tips, tricks, modifications and strategies regarding materials created in the hope that you too will try your hand at making some unique, child-specific materials for your student or child. When appropriate, I will offer templates and other materials for you to use, to complete the project as well.
For this post, I will be sharing my interpretation of an idea from the blog titled, “While You Are Home: Activities for Children With CVI” by Dr. Christine Roman. In the blog, Dr. Roman suggests creating a Visual Journal, where the student chooses an image (or several images) that represent activities completed each day of the week. You are encouraged to read Dr. Roman’s blog first, so you will better understand how this activity might be used. You can access this blog at Dr. Roman’s website cviresources and at Paths to Literacy;
http://cviresources.com/while-you-are-home/
https://www.pathstoliteracy.org/blog/while-you-are-home-activities-children-cvi

What you will need to create this activity:
To create this activity, you will need to think about your child’s or student’s daily activities. Next, download an image, take a photograph or locate an image of something that represents each activity. For example, if on Monday, your child or student goes to swimming lessons in the morning, then after lunch might look through books, then later on that same day, helps to fold clean laundry, you might collect images of a pair of swim goggles, a shelf holding books, and a laundry basket. Print or cut out the images and attach them to small rectangles (approx. 2” X 3” in size) of heavy card stock or tag board. If you print the image from a color printer, use 8.5” X 11” label sheets so you can peel off the backing and stick each image right on the tag board rectangle. Attach the Loop side of Hook and Loop self-adhesive tape to the backside of the images, if you plan to use Hook and Loop pages. See photo below.

Alternately, you can simply use heavy card stock pages and glue images right on each day-of-the-week named page. The advantage of using Hook and Loop pages with images that can adhere is that if in the future, in another week, you work on this activity and the child needs the same image, it can be reused.
For the notebook, I used a ready-made, approximately 7” by 9” black, 3-ring binder.
For the pages, I cut 8 pages out of heavy, black card stock to fit the notebook and punched the 3 holes. Pages 1-7 are for the days of the week with Journal images and page 8 was used as a “home” for the bubbled words. Using the Hook and Loop compatible fabric, I cut rectangles to fit each page, cutting the fabric about ½ inch to ¾ inch narrower than the page, to accommodate the 3 punched holes.

I used Tacky Spray Adhesive and sprayed each card stock page, then carefully fit the Hook and Loop fabric onto the glue/page. I weighed down each page with heavy wood until it was dry. Some trimming was needed after each page dried.
Finally, create your bubbled days of the week. Using the Roman Word Bubbling Tool, choose your child’s or student’s preferred outline color and create your words (days of the week) in 3 ways; Each day of the week “Bubbled” with a black background, the color outline of each day of the week with a black background, and the printed days of the week with a white background. See below.


To use the Roman Word Bubbling tool, I create the bubbled words in the text box, choose my student’s preferred font and outline color, then decide on my font size, outline width and gap width. I keep all these preferences the same for all the days of the week I create. The first set of days of the week I created with the feature, “dark background”. The second set of days of the week was created with the features, “hide text” and “dark background”. The third set of days of the week was created with neither feature checked. After each set was created, I used screen shot on my MacBook Air to capture the image. I then put all 3 images on a Word Doc. Since I was printing it off on a color printer using Label Paper, I wanted to fit in as much as I could on the sheet. Therefore, I added some of my images that needed to be printed. One of Label Sheets I printed looked like this;

At the end of the week, your child or student will have fun looking back over their Visual Journal and recalling all the activities that were completed. You can talk about the image and what it represents, including the salient features of each item. If you are using Hook and Loop pages, all the images can be pulled off at the end of the week and put into a small box for future use. At this point, you’ll want to gather new images which represent activities that will happen during the following week, or make them “on the fly” as activities and experiences happen. At the beginning of the new week, this activity can be started up again.
Please note: One or more of the links noted on this blog are affiliate links. This simply means that if you click on a link and make a purchase, I may receive a small commission at NO EXTRA cost to you. As an Amazon Affiliate, I earn from qualifying purchases.
Tips, Tricks, Modifications and Strategies
Phase III: Map of Familiar Area
May 8, 2020
Creating materials for students with CVI is always fun for me and I often wish I had more time to be creative. During these days of social distancing, I finally have some time to create all of the materials and books that have been on my, “To Do” list. I will be posting photos of materials, along with tips, tricks, modifications and strategies regarding materials created in the hope that you too will try your hand at making some unique, child-specific materials for your student or child. When appropriate, I will offer templates and other materials for you to use, to complete the project as well.
For this post, I will be sharing my interpretation of an idea from the blog titled, “While You Are Home: Activities for Children With CVI” by Dr. Christine Roman. In the blog, Dr. Roman suggests creating a map of a familiar area for your student, such as their backyard. Using shapes, photo images and actual targets, you can create a sequence of activity which the child replicates. You are encouraged to read Dr. Roman’s blog first, so you will better understand how this activity might be used. You can access this blog at Dr. Roman’s website cviresources and at Paths to Literacy;
http://cviresources.com/while-you-are-home/
https://www.pathstoliteracy.org/blog/while-you-are-home-activities-children-cvi
What you will need to create this activity:
To create this activity, you will need to begin by choosing an area that is familiar to your student. This might be his or her familiar backyard, a play area or a familiar park. Once the area is chosen, pick out several familiar landmarks at this location. Now, you will need to recreate this location (complete with familiar landmarks) on your felt board or other map-making surface. While I am not currently working directly with a student due to our stay at home orders, I still wanted to create this activity to see how doable it was. Therefore, I used my own familiar backyard setting including our pool, the patio table/chairs, specific trees (including our small orange tree), a BBQ grill and lounge chairs with blue cushions. As noted above, I used an old felt board I have had for years which included some pre-cut pieces (sun, clouds, hedge, trees and bushes). Depending on the student’s CVI Range score and level of complexity tolerated, you may or may not choose to use pieces such as these.
To recreate my backyard with familiar landmarks, I went to the internet and found exact (or close to) images of my lounges (with blue cushions), patio table/chairs and BBQ grill. We have a small orange tree and I found an image of that, as well as an image of a pool that is very close in shape to ours. Alternately, you could take crisp, clear photographs of the familiar landmarks. I printed my internet images with my color printer on 1 large shipping label. Once the images were cut out, they were then attached to a firmer tagboard and backed with either felt or with hook and loop tape (loop side) so they can adhere easily to the felt board.
Pictured below, the printed, realistic photograph cutouts of familiar landmarks.

Pictured below, I have used the felt board to represent my backyard and these key familiar landmarks are placed approximately where they would be found in my actual backyard.

I used an image of Elmo as my simple character figure to create a sequence of activity. This sequence of activity might be as follows; Elmo walks from the patio table to the BBQ. From the BBQ, he runs to the small orange tree and hides. From the orange tree he hops to the lounges with the blue cushions. In this scenario, there most likely would be much discussion about the salient features of each of these landmarks. You might want to have photographs of the actual landmarks on your iPad, so the student can zoom in and look at the salient features more carefully. Once the student practices this sequence using the simple character figure, he/she can then try it with their own body in their backyard.
As the student moves further along the CVI Range and can tolerate more complexity in the map array, more backyard color photo representations could be added. If felt cutouts are used (i.e. yellow sun, green triangular shaped trees, etc), the student should be well into Phase III and have an understanding of symbols that represent real objects and landmarks. My map with all the bits and pieces that could be used, is pictured below.

Since all the pieces for the map “stick” or “hook” onto the felt board, I placed Velcro tabs on the back of my felt board and was able to mount it onto the All-In-One Board. In this way, I am able to bring the felt board up into my student’s best field of view (if needed).
Please note: One or more of the links noted on this blog are affiliate links. This simply means that if you click on a link and make a purchase, I may receive a small commission at NO EXTRA cost to you. As an Amazon Affiliate, I earn from qualifying purchases.
Tips, Tricks, Modifications and Strategies
Phase III: Salient Features “Go Fish” Game
May 4, 2020
Creating materials for students with CVI is always fun for me and I often wish I had more time to be creative. During these days of self-quarantine, I finally have some time to create all of the materials and books that have been on my, “To Do” list. I will be posting photos of materials, along with tips, tricks, modifications and strategies regarding materials created in the hope that you too will try your hand at making some unique, child-specific materials for your student or child. When appropriate, I will offer templates and other materials for you to use, to complete the project as well.
For this post, I will be sharing my interpretation of an idea from the blog titled, “While You Are Home: Activities for Children With CVI” by Dr. Christine Roman. In the blog, Dr. Roman suggests creating a. “salient features “go fish” game. You are encouraged to read Dr. Roman’s blog first, so you will better understand how this activity might be used. You can access this blog at Dr. Roman’s website cviresources and at Paths to Literacy;
http://cviresources.com/while-you-are-home/
https://www.pathstoliteracy.org/blog/while-you-are-home-activities-children-cvi
What you will need to create this activity:
To create this modified “go fish” game, you might begin by cutting your blank cards. I cut my cards 2.75” X 4.25” in size. I then used a corner rounding paper punch to make the corners of the cards look more professional (this step is entirely optional). An easier choice would be to use precut, blank, 3” X 5” index cards. You could make them a bit more “fancy” by using a corner rounding paper punch on the corners.
Once you have your blank cards ready to go, you can begin creating at least 5 to 7 sets of 2D pictures, each set being of the same subject. I would choose your 5 to 7 subjects with consideration of subjects your student or child is knowledgeable about and possibly, that you have discussed in terms of each subject’s salient features. Also make sure that you have a clear understanding of your students’ CVI Range score as you choose the type of 2D picture (color realistic photograph, color illustration, black and white illustration, black and white line drawing, etc.). You can collect your 2D images by cutting out simple magazine images, as suggested by Dr. Roman, or you can go to one of the free image download sites online to gather your images.
If you have gathered your images from magazines, glue them on to the face of your cards. If you have gathered your images from the internet, arrange them on a word.doc and print them using 8.5” X 11” Shipping Labels in a high-quality color printer. Cut out the individual images, peel off the backing and affix to the cards.
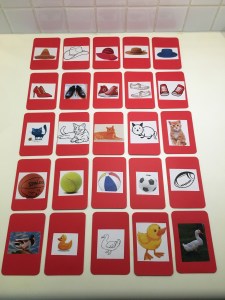
Pictured below, the complete collection of 5 sets; ducks, balls, cats, shoes, hats.
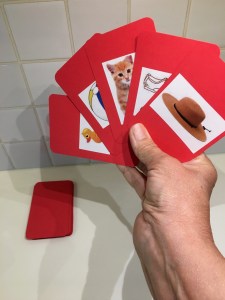
Pictured below, an example of a “hand’ of cards with the “Go Fish” stack in the background.
Pictured below, use of a 3D object (a hat) to review the salient features associated with that object, to better help the student recognize cards displaying this object.

Pictured below, use of a 3D object (a ball) to review the salient features associated with that object, to better help the student recognize cards displaying this object.

Please note: One or more of the links noted on this blog are affiliate links. This simply means that if you click on a link and make a purchase, I may receive a small commission at NO EXTRA cost to you. As an Amazon Affiliate, I earn from qualifying purchases.
Tips, Tricks, Modifications and Strategies
Octopus Light (AKA the “Jellyfish Light”)
May 2, 2020

Creating materials for students with CVI is always fun for me and I often wish I had more time to be creative. During these days of self-quarantine, I finally have some time to create materials, books and even do some repair work, that has been on my, “To Do” list. I will be posting photos of materials, along with tips, tricks, modifications and strategies regarding materials created in the hope that you too will try your hand at making some unique, child-specific materials for your student or child. When appropriate, I will offer templates and other materials for you to use, to complete the project as well. For this post, I will be sharing how I make a lighted target I often use with students who visually function in Phase I, and even just into Phase II; The Octopus Light.
What you will need to make this Octopus Light:
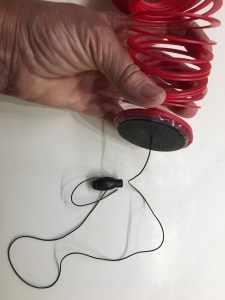
Pictured below, 4 packs of Mardi Gras necklaces (there are 12 necklaces in a pack).

First, cut each of the 41 necklaces once, to give you 41 – 32-inch-long strands.

Next, if you use the Brilliant Evolution Wireless Color Changing Puck Light, you can unscrew the back cap. You will see two holes. Thread the cable zip tie through the holes and fasten the zip tie on the outside of the cap (in this way the connection will not interfere with the batteries inside). Trim off any excess length.


While the cap is off, place your batteries inside as directed, being careful to flatten the zip tie inside when you screw the cap back in place.

Using a hot glue gun, run about a 1-inch length of hot glue along the upper, outside edge of the puck light. IMPORTANT: Make sure that the hot glue does not drip down more than a width of about 1/4th inch. You do NOT want to glue to get into the screw-cap mechanism you turn to get to the batteries. Work fast to fasten each bead length to the hot glue, then wait until that grouping of beads and glue hardens before you apply another 1-inch length to set in place your next few bead lengths. It is best to work a short distance at a time because if you are not careful, the glue drips downward and may seal the screw-cap mechanism shut. Note: I prop the puck light on its side by wrapping a towel or other piece of materials around it, as I work.


Hang your Octopus Light inside of a CVI Den or from an Invisiboard Toy Bar. Activate the light so that it provides a steady (not flashing) colored light that is the same as the chosen color of beads. This visual target is not child safe; the child must be watched at all times when working with this target.
Please note: One or more of the links noted on this blog are affiliate links. This simply means that if you click on a link and make a purchase, I may receive a small commission at NO EXTRA cost to you. As an Amazon Affiliate, I earn from qualifying purchases.
Tips, Tricks, Modifications and Strategies
Invisiboard Toy Bar
May 1, 2020

Creating materials for students with CVI is always fun for me and I often wish I had more time to be creative. During these days of self-quarantine, I finally have some time to create materials, books and even do some repair work, that has been on my, “To Do” list. I will be posting photos of materials, along with tips, tricks, modifications and strategies regarding materials created in the hope that you too will try your hand at making some unique, child-specific materials for your student or child. When appropriate, I will offer templates and other materials for you to use, to complete the project as well. For this post, I will be sharing how re-designed my Invisiboard Toy Bar.
If you read my last post, you will know that my Invisiboard had to be refurbished because the fabric was falling off. I blamed it on the hot car travel I do as an independent consultant, mostly here in the state of Texas where materials stored in the back of a car can get incredibly hot. My Invisiboard had lost its “glue grip” and the hook and loop compatible fabric was disintegrated. What I didn’t say was that the design of my old Invisiboard Toy Bar was probably somewhat responsible for the fabric’s demise. My previous Toy Bar used to fasten to the sides of the Invisiboard by Velcro. When I attached toys and other visual targets to the bar, the fabric came loose.
Pictured above: Previous method of fastening the bar to the panels – using Velcro on the ends of the bar.

Pictured above: Previous Invisiboard which had the fabric pulled away from the panels, partly due to the Toy Bar (first edition).
Therefore, I redesigned the Toy Bar so that it now rests on the top edge of each side panel. In this way, I can hang relatively heavy toys and targets on the Bar and it won’t weigh down the hook and loop compatible fabric.
What you will need to make this updated, Invisiboard Toy Bar:
Cut and Mark the PVC Pipe
First, cut your PVC pipe to the appropriate length using a PVC pipe cutting tool or a Sawzall. I cut the pipe a length of 27.5 inches.

Next, mark where you will want to cut the channel at either end of the pipe. Mark the pipe as it sits on the board, so you can match the angle of the side panels.
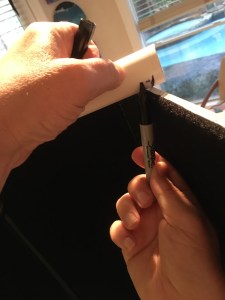
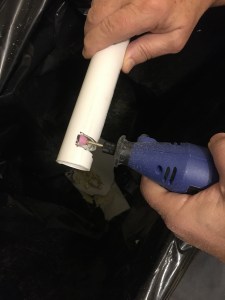
Cut the Channel on either side of the Pipe
Using a Sawzall, carefully cut ½ way through the pipe, following your marked guidelines.

Use a Dremel to cut the horizontal cut that will release the channel.
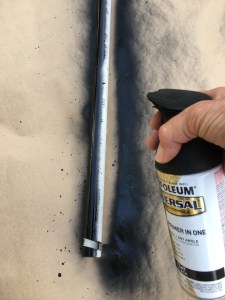
Paint the Bar
Using a flat, black spray paint, paint the bar covering the white evenly.
I use black rubber bands on the pipe, which I attach my visual targets to (alternately, you could cut a small oval hole with a Dremel). Many of the targets I attach to the Bar with a black, retractable name badge. I use the hook on the name badge and hook it through the rubber band or the Dremel hole. By using the retractable name badge, when the child grabs the object, they can then pull it towards themself, then release it and it goes back to its original position. Also, keep in mind that some children have a different field of reach (FoR) from their field of view (FoV). For these children, make sure you have hanging visual targets, such as a Slinky Jr., which hangs in their field of reach, and when they grasp it and it shakes, they can see that action in their field of view. In this way they can develop a better understanding of cause and effect.


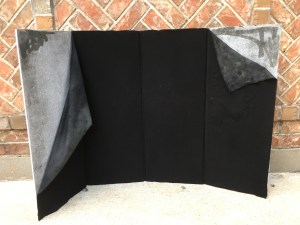
Author’s Note: During one of our recent “Coffee Hour” Zoom Webinars covering materials to use with students who visually function in Phase II, one of the attendees noted in the Chat Box an alternate idea, that is much less expensive and really, does almost the same thing. She noted that uses a black tri-fold board (I assume the type you can purchase at Office Depot for Science Projects) and puts holes in the two folded sides then inserts a piece of black-taped PVC pipe. She notes that she uses it with kiddos on the floor, in wheelchairs, adaptive chairs, etc. She uses clear shower rings to hang targets from and the board helps to block out extraneous distractions.

My interpretation of what she mentioned is as follows.
Materials needed:
Cut your PVC pipe about 31 inches in length. Spray paint it black. Mark your 1-inch diameter circles on the top, side panels of your presentation board (I marked my circles 6 inches in from each side and down 1 inch from the top).

Place your presentation board on top of the self-healing mat and carefully cut out the circle.


Thread your black bar (PCV pipe) through the holes and hang a target (or targets) on it so that they hang within reach of your student.

Please note: One or more of the links noted on this blog are affiliate links. This simply means that if you click on a link and make a purchase, I may receive a small commission at NO EXTRA cost to you. As an Amazon Affiliate, I earn from qualifying purchases.
Tips, Tricks, Modifications and Strategies
How to Refurbish Your Invisiboard
April 29, 2020
BEFORE

AFTER
Creating materials for students with CVI is always fun for me and I often wish I had more time to be creative. During these days of self-quarantine, I finally have some time to create materials, books and even do some repair work, that has been on my, “To Do” list. I will be posting photos of materials, along with tips, tricks, modifications and strategies regarding materials created or repaired in the hope that you too will try your hand at making some unique, child-specific materials for your student or child. When appropriate, I will offer templates and other materials for you to use, to complete the project as well. For this post, I will be sharing how I gave new life to my Texas heat damaged, drooping Invisiboard.
The Invisiboard, created and offered by APH, is a must have item for anyone who works with students with Cortical Visual Impairment (CVI). It helps to block out additional visual clutter, reducing complexity in the array. In addition, its fabric is hook and loop compatible, so you can hang items from the face of the board. Traveling in a car as much as I do in a hot climate, my Invisiboard has lost its “glue grip” and the hook and loop compatible fabric has disintegrated; literally peeled off from the 4 paneled board. The good news is that the 4-panel accordion folding backing board is still in great condition and the carrying bag is still perfect for the board. Therefore, I decided to refurbish my Invisiboard. Since many people out there are having the same problem (and buying a new one is wasteful and somewhat expensive), I thought I would share what I have found to work best for this “make over”.
What you will need to refurbish your Invisiboard:
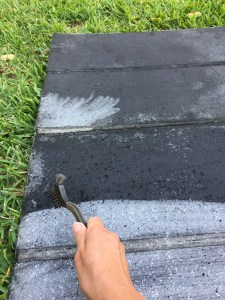
Clean the Board
To begin the refurbishing process, go outside, preferably on the lawn. This first part is messy, and the gluey pieces are best left in the yard! If the original hook and loop fabric hasn’t completely fallen off (like mine had), then pull off the fabric and carefully place it in the trash. Next, you have to clean off that sticky, black tar-like substance. I used a wire brush, similar to what you might clean a BBQ grill with.
Once you get the majority of the black stuff off with the wire brush, use a sanding block or a piece of sandpaper to get off the rest.
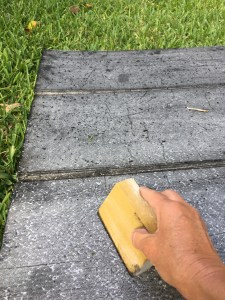
Once all 4 panels are smooth to the touch (all black, sticky particles removed), you can bring it inside.
Cut the Fabric
Since this fabric is thicker than the original and I wanted the panels to fold up flat (and still fit in the custom bag), I decided to use 4 individual panels of fabric rather than one solid rectangle of fabric. I used a Fiskars 60mm rotary cutter on my Fiskars self-healing mat to cut 4 pieces of fabric, each 11.25 X 30 inches in size.


Glue the Fabric
For each 4 oz. bottle of Aleene’s Quick Dry Tacky Glue you should have enough to cover two panels. Do one panel at a time. Spread 2 oz. of glue evenly over the entire panel. I used my pointer finger to spread the glue, but you could get fancy and use an old brush (might be neater).

Once the glue is spread on one panel, clean your fingers and hands extremely well. Then, carefully position the material, hook and loop side up, onto the glue. There should be slight hangover at the top and bottom. You can cut off that excess later.

Smooth out any bubbles or warping. This can take up to an hour of smoothing and flattening (that’s why you only do one panel at a time).

Repeat this process with the other 3 panels. Once the glue has dried and all 4 panels of fabric has dried flat (no warping), you will want to trim off any excess fabric at the top and bottom. I flipped the board over and used my Fiskars rotary cutter to cut right along the edge and against a self-healing mat.

Next, cut 3 lenghts, about 33” long, of the gaffers’ tape. I like using this tape because it has no glare or shine, like Duck Tape. The gaffers’ tape should be just wide enough to fit in the slot between each panel. The gaffers’ tape should not overlap onto the fabric (the glue should hold the edges of the fabric well enough). You will want to bend two panels upward to really expose the backside of the tape holding the two panels together. Cover this slot with the gaffers’ tape. You should now have a completely refurbished Invisiboard.
Watch for a future Post on how to make an “Invisiboard Toy Bar” to go with your newly refurbished Invisiboard.
Tips, Tricks, Modifications and Strategies
Phase II: Environmental Features Matching Game
April 27, 2020
Creating materials for students with CVI is always fun for me and I often wish I had more time to be creative. During these days of self-quarantine, I finally have some time to create all of the materials and books that have been on my, “To Do” list. I will be posting photos of materials, along with tips, tricks, modifications and strategies regarding materials created in the hope that you too will try your hand at making some unique, child-specific materials for your student or child. When appropriate, I will offer templates and other materials for you to use, to complete the project as well.
For this post, I will be sharing my interpretation of an idea from the blog titled, “While You Are Home: Activities for Children With CVI” by Dr. Christine Roman. In the blog, Dr. Roman suggests creating a matching game using small photo images of environmental features. You are encouraged to read Dr. Roman’s blog first, so you will better understand how this activity might be used. You can access this blog at Dr. Roman’s website cviresources and at Paths to Literacy;
http://cviresources.com/while-you-are-home/
https://www.pathstoliteracy.org/blog/while-you-are-home-activities-children-cvi
What you will need to create this activity:
To create this activity, you will need to begin by taking crisp, clear photographs of familiar environmental features in your student’s home, such as the faucet that is part of the sink area in the student’s familiar kitchen, or part of a large vase in the student’s familiar entryway. Next, print a hard copy of those photographs of familiar environmental features. I print the images out on a full sheet of label paper, then affix that to magnetic paper so that I can present the photo, or photo part, on a magnetic slant board. Show one of the prompt photos to your student and ask where the whole object or feature is in their home.
Pictured below, the entryway of a home and several small photo images showing parts of that entryway display. The terra cotta vase photo on the right shows only part of the whole.

Pictured below, a kitchen/dining area of a home and several small photo images showing parts of that kitchen area. The faucet photo shows only part of the whole sink area.

Tips, Tricks, Modifications and Strategies
Phase II: Simple Puzzles
April 26, 2020
Creating materials for students with CVI is always fun for me and I often wish I had more time to be creative. During these days of self-quarantine, I finally have some time to create all of the materials and books that have been on my, “To Do” list. I will be posting photos of materials, along with tips, tricks, modifications and strategies regarding materials created in the hope that you too will try your hand at making some unique, child-specific materials for your student or child. When appropriate, I will offer templates and other materials for you to use, to complete the project as well.
For this post, I will be sharing my interpretation of an idea from the blog titled, “While You Are Home: Activities for Children With CVI” by Dr. Christine Roman. In the blog, Dr. Roman discusses the use of simple puzzles of 2-3 pieces (more pieces if Phase III) made from pictures. You are encouraged to read Dr. Roman’s blog first, so you will better understand how this activity might be used. You can access this blog at Dr. Roman’s website cviresources and at Paths to Literacy;
http://cviresources.com/while-you-are-home/
https://www.pathstoliteracy.org/blog/while-you-are-home-activities-children-cvi
What you will need to create this activity:
To create this activity, you will need to begin by determining what the student’s favorite familiar targets or objects are. Then, take a crisp, clear photo of that target. Print a hard copy of that photo and download the image onto an iPad or other tablet. I often simply place the photo in my iPad’s photos or if I will be working with several photos, I use Keynote or PowerPoint. Next, print off another color hard copy of the photo, enlarged to about 6” X 8”, but use an 8.5” X 11” shipping label to print it on. Peel the back off of the label and affix it to a magnetic sheet. Then, cut the picture into 2 or 3 pieces to make the puzzle.
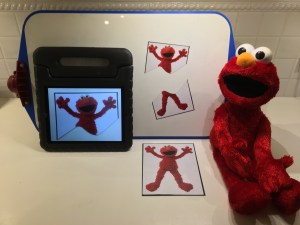
Pictured below, a 3D favorite toy (Elmo), a hard copy of a photograph of Elmo, a simple puzzle of 2 pieces of Elmo, and an iPad showing a single piece of the puzzle. The magnetic puzzle pieces are affixed to an APH All-In-One Board.
For students who can tolerate greater complexity (high Phase II or into Phase III), you might create a puzzle with more pieces. You can download a puzzle template and transfer the pattern to the back of the magnetic sheet then cut out the pieces.
The next 2 pictures below show a 3D favorite toy (Elmo), a hard copy of a photograph of Elmo, a more complex puzzle of 6 pieces, and an iPad showing a single piece of the puzzle. The magnetic puzzle pieces are affixed to an APH All-In-One Board.


