Tips, Tricks, Modifications and Strategies
How to Refurbish Your Invisiboard
April 29, 2020
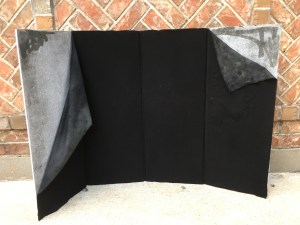
BEFORE

AFTER
Creating materials for students with CVI is always fun for me and I often wish I had more time to be creative. During these days of self-quarantine, I finally have some time to create materials, books and even do some repair work, that has been on my, “To Do” list. I will be posting photos of materials, along with tips, tricks, modifications and strategies regarding materials created or repaired in the hope that you too will try your hand at making some unique, child-specific materials for your student or child. When appropriate, I will offer templates and other materials for you to use, to complete the project as well. For this post, I will be sharing how I gave new life to my Texas heat damaged, drooping Invisiboard.
The Invisiboard, created and offered by APH, is a must have item for anyone who works with students with Cortical Visual Impairment (CVI). It helps to block out additional visual clutter, reducing complexity in the array. In addition, its fabric is hook and loop compatible, so you can hang items from the face of the board. Traveling in a car as much as I do in a hot climate, my Invisiboard has lost its “glue grip” and the hook and loop compatible fabric has disintegrated; literally peeled off from the 4 paneled board. The good news is that the 4-panel accordion folding backing board is still in great condition and the carrying bag is still perfect for the board. Therefore, I decided to refurbish my Invisiboard. Since many people out there are having the same problem (and buying a new one is wasteful and somewhat expensive), I thought I would share what I have found to work best for this “make over”.
What you will need to refurbish your Invisiboard:
- 2 yards of hook and loop compatible material (at least 24” wide). I used a Velcro brand black woven wider loop https://amzn.to/2VInTjE *affiliate income
- 2 – 4oz. bottles of Aleene’s Quick Dry Tacky Glue https://amzn.to/2YfI0HS *affiliate income
- A wire brush and/or sandpaper
- Black gaffers’ tape, 1” wide https://amzn.to/2SkcNiW *affiliate income
- Scissors or Fiskars rotary cutter (I use a Fiskars 60mm blade) and a self-healing cutting mat
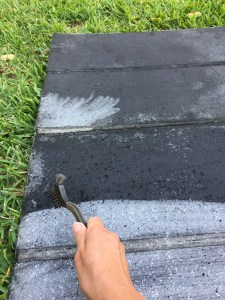
Clean the Board
To begin the refurbishing process, go outside, preferably on the lawn. This first part is messy, and the gluey pieces are best left in the yard! If the original hook and loop fabric hasn’t completely fallen off (like mine had), then pull off the fabric and carefully place it in the trash. Next, you have to clean off that sticky, black tar-like substance. I used a wire brush, similar to what you might clean a BBQ grill with.
Once you get the majority of the black stuff off with the wire brush, use a sanding block or a piece of sandpaper to get off the rest.
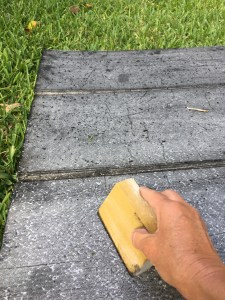
Once all 4 panels are smooth to the touch (all black, sticky particles removed), you can bring it inside.
Cut the Fabric
Since this fabric is thicker than the original and I wanted the panels to fold up flat (and still fit in the custom bag), I decided to use 4 individual panels of fabric rather than one solid rectangle of fabric. I used a Fiskars 60mm rotary cutter on my Fiskars self-healing mat to cut 4 pieces of fabric, each 11.25 X 30 inches in size.


Glue the Fabric
For each 4 oz. bottle of Aleene’s Quick Dry Tacky Glue you should have enough to cover two panels. Do one panel at a time. Spread 2 oz. of glue evenly over the entire panel. I used my pointer finger to spread the glue, but you could get fancy and use an old brush (might be neater).

Once the glue is spread on one panel, clean your fingers and hands extremely well. Then, carefully position the material, hook and loop side up, onto the glue. There should be slight hangover at the top and bottom. You can cut off that excess later.

Smooth out any bubbles or warping. This can take up to an hour of smoothing and flattening (that’s why you only do one panel at a time).

Repeat this process with the other 3 panels. Once the glue has dried and all 4 panels of fabric has dried flat (no warping), you will want to trim off any excess fabric at the top and bottom. I flipped the board over and used my Fiskars rotary cutter to cut right along the edge and against a self-healing mat.

Next, cut 3 lenghts, about 33” long, of the gaffers’ tape. I like using this tape because it has no glare or shine, like Duck Tape. The gaffers’ tape should be just wide enough to fit in the slot between each panel. The gaffers’ tape should not overlap onto the fabric (the glue should hold the edges of the fabric well enough). You will want to bend two panels upward to really expose the backside of the tape holding the two panels together. Cover this slot with the gaffers’ tape. You should now have a completely refurbished Invisiboard.
Watch for a future Post on how to make an “Invisiboard Toy Bar” to go with your newly refurbished Invisiboard.
