Family Video of a Routine, April 25, 2020

Tips, Tricks, Modifications and Strategies

Phase II: Family Video of a Routine

April 25, 2020

Creating materials for students with CVI is always fun for me and I often wish I had more time to be creative.  During these days of self-quarantine, I finally have some time to create all of the materials and books that have been on my, “To Do” list.  I will be posting photos of materials, along with tips, tricks, modifications and strategies regarding materials created in the hope that you too will try your hand at making some unique, child-specific materials for your student or child.  When appropriate, I will offer templates and other materials for you to use, to complete the project as well.

For this post, I will be sharing my interpretation of an idea from the blog titled, “While You Are Home: Activities for Children With CVI” by Dr. Christine Roman.  In the blog, Dr. Roman discusses use of family videos and/or making a video diary.  Since I am quarantined at my home, I do not have access to a student right now to give you an exact example of this activity but will give you a close alternate option below.  You are encouraged to read Dr. Roman’s blog first, so you will better understand how this activity might be used.  You can access this blog at Dr. Roman’s website cviresources and at Paths to Literacy;

http://cviresources.com/while-you-are-home/

https://www.pathstoliteracy.org/blog/while-you-are-home-activities-children-cvi

What you will need to create this activity:

  • iPad or other tablet technology
  • Application for documenting a story with photographs, such as Pictello

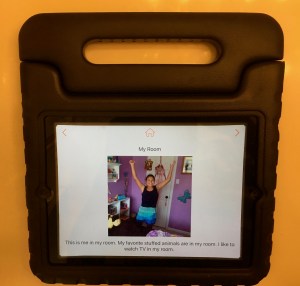
While I haven’t used video to create a video diary, I have often used photographs to create stories about my students.  My favorite application to use is Pictello.  I encourage my student to create a story and I give them a topic.  They take the photographs and with help and guidance, we create an electronic “book”.  If able, the student dictates to me what they want written on each page (I type it in).  Usually, this is a repetitive line, one line per page such as, “This is my dog”, “This is my Cat”, This is my mom”, etc.  This technique could easily be used to create, “a day in the life” or “favorite parts of my day”, as Dr. Roman suggests.

Pictured below, an iPad showing the Home screen for Pictello and the titles of some books my students have helped to create.

Pictured below, an iPad showing one of the “pages” in a Pictello created book with the story lines created by the student.

Matching Game, April 21, 2020

Tips, Tricks, Modifications and Strategies

Phase II: Matching Game (with options for an Advanced Matching Game)

April 21, 2020

Creating materials for students with CVI is always fun for me and I often wish I had more time to be creative.  During these days of self-quarantine, I finally have some time to create all of the materials and books that have been on my, “To Do” list.  I will be posting photos of materials, along with tips, tricks, modifications and strategies regarding materials created in the hope that you too will try your hand at making some unique, child-specific materials for your student or child.  When appropriate, I will offer templates and other materials for you to use, to complete the project as well.

For this post, I will be sharing my interpretation of an idea from the blog titled, “While You Are Home: Activities for Children With CVI” by Dr. Christine Roman.  Dr. Roman notes that this visual target could be used with a child in Phase II, although there is an advance version for children in high Phase II or Phase III.  You are encouraged to read Dr. Roman’s blog first, so you will better understand how this target might be used.  You can access this blog at Dr. Roman’s website cviresources and at Paths to Literacy;

http://cviresources.com/while-you-are-home/

https://www.pathstoliteracy.org/blog/while-you-are-home-activities-children-cvi


Materials needed to make this game:

  • Exact, realistic color photographs of the student’s favorite, familiar items
  • The matching favorite, familiar object
  • The exact, realistic color photographs presented on an iPad or other tablet
  • Office Depot Shipping Labels (8 ½ X 11 inches), or other premium full sheet shipping label https://amzn.to/2VpNVIf *affiliate income
  • Avery Printable Magnetic sheets (8 ½ X 11 inches) https://amzn.to/3eFJGA5 *affiliate income
  • All-In-One Board or other small magnetic dry erase white board https://amzn.to/3bnc4F3 *affiliate income

First, determine what the student’s favorite familiar toys and visual targets are.  These would be objects the child consistently looks at which may or may not be toys.  Take crisp, clear photographs of each item individually, against a plain, high contrast background (strictly limit complexity in the array) or locate a stock photo which is an exact image using clip art.  Upload the photo on the iPad (or tablet) and store in apps such as PowerPoint, Keynote, Pictello or simply store in Photos.  Print off the chosen pictures using a high-quality color photocopy machine.  I printed my photos on 8 ½” X 11” Shipping Labels.  The backing was then peeled off and the photos were attached to 8½” X 11” Magnetic Sheets.  Cut out the individual printed photographs.  I presented my color photographs on a white magnetic board (All-In-One Board) so that it could be presented in my student’s best field of view.

To play the game, present the favorite, familiar 3D object to the child and encourage them to look for the 2D photo representing that object.  You might start with 2 photos to choose between, then as the child gets better at locating the matching photo, use 3 photos to choose between, and so on.  Note that the child may reach out and touch the matching photo, swipe at the photo, use head turn and/or eye gaze.

For a more advanced, high Phase II version of this game, again use the child’s favorite, familiar objects or targets and print off photographs of the targets, but this time, use color illustrations and/or black and white line drawings (not the exact color realistic image).  Possibly use pictures of the same item but in a different color, etc.  Again, give the child the familiar 3D target and ask them to visually locate the “matching” photo.

Pictured below, the complete assortment of items for this activity (basic and advanced), including the real 3D objects (Elmo, red bucket, red duck red Mardi Gras necklace and red mylar pom pom), the iPad to present the realistic color photographs, the photographs of the exact images and the photographs of the target presented in black and white line drawings or color illustrations, and an All-In-One Board which the magnetic pictures adhere to.

Pictured below, red mylar pom pom, exact photograph of the pom pom on the iPad, All-In-One Board with 4 color realistic photographs, including one exact realistic image of the red pom pom.

Pictured below, red Mardi Gras bead necklace, exact photograph of the red necklace on the iPad, All-In-One Board with 4 color realistic photographs, including one exact realistic image of the red Mardi Gras necklace.

Pictured below is a photograph of the Advanced Phase II version of this game;


Please note: One or more of the links noted on this blog are affiliate links.  This simply means that if you click on a link and make a purchase, I may receive a small commission at NO EXTRA cost to you.  As an Amazon Affiliate, I earn from qualifying purchases.

Pom Pom in Container, April 13, 2020

 Tips, Tricks, Modifications and Strategies

Phase I Target: Pom Pom in a Container

April 13, 2020

Creating materials for students with CVI is always fun for me and I often wish I had more time to be creative.  During these days of self-quarantine, I finally have some time to create all of the materials and books that have been on my, “To Do” list.  I will be posting photos of materials, along with tips, tricks, modifications and strategies regarding materials created in the hope that you too will try your hand at making some unique, child-specific materials for your student or child.  When appropriate, I will offer templates and other materials for you to use, to complete the project as well.

For this post, I will be sharing my interpretation of an idea from the blog titled, “While You Are Home: Activities For Children With CVI” by Dr. Christine Roman.  Dr. Roman notes that this visual target could be used with a child in Phase I.  You are encouraged to read Dr. Roman’s blog first, so you will better understand how this target might be used.  You can access this blog at Dr. Roman’s website cviresources and at Paths to Literacy;

http://cviresources.com/while-you-are-home/

https://www.pathstoliteracy.org/blog/while-you-are-home-activities-children-cvi

Materials needed to make this target:

  • Clean, empty non-breakable bottle or container with a lid. I like using empty plastic containers, round or square shaped, with black lids.
  • Mylar pom poms, mylar reflective holiday garland or mylar-like curled ribbon in the child’s preferred color.
  • Small, battery operated lights in the same color as the mylar material. Finger lights or bullet lights both work well.  Note:  Finger lights can be found at Amazon https://amzn.to/2XtQ4nJ (affiliate) while bullet lights can be found on the Wish app and are called, “Multi-colored Flash LED Ball Lamp Balloon Light for Home Wedding Party Decoration Crafting Costume Making”.

Remove any labels from the outside of the bottle and clean the inside of the bottle well.  Attach finger lights or bullet lights to mylar strands (I tied mine onto the garland and the ribbon).  Turn on the lights and fill the bottle loosely with the pom pom material or other mylar-like material.  Put the lid on the bottle or container.  Turn down the room lights or offer this target in a darkened room for best results.

Pictured below, a red mylar-like garland with red finger lights tied onto the garland.  The container used was originally a large, spice bottle.


Pictured below, red mylar-like curled bows with red bullet hanging down from the lid.  The large, square shaped container was originally filled with raw cashews.


The labels for both bottles have been cleaned off with Goof Off Pro Strength Remover.


Please note: One or more of the links noted on this blog are affiliate links.  This simply means that if you click on a link and make a purchase, I may receive a small commission at NO EXTRA cost to you.  As an Amazon Affiliate, I earn from qualifying purchases.

Rolling Ball Video, April 12, 2020

Tips, Tricks, Modifications and Strategies

Phase I Target: Rolling ball video

April 12, 2020

Creating materials for students with CVI is always fun for me and I often wish I had more time to be creative.  During these days of self-quarantine, I finally have some time to create all of the materials and books that have been on my, “To Do” list.  I will be posting photos of the materials, along with tips, tricks, modifications and strategies regarding the materials created in the hope that you too will try your hand at making some unique, child-specific materials for your student or child.  When appropriate, I will offer templates and other materials for you to use, to complete the project as well.

For this post, I will be sharing my interpretation of an idea from the blog titled, ““While You Are Home: Activities For Children With CVI” by Dr. Christine Roman.  Dr. Roman notes that this visual target could be used with a child in Phase I.  You are encouraged to read Dr. Roman’s blog first, so you will better understand how this target might be used.  You can access this blog at Dr. Roman’s website cviresources and at Paths to Literacy;

http://cviresources.com/while-you-are-home/

https://www.pathstoliteracy.org/blog/while-you-are-home-activities-children-cvi

Phase I, Activity 2: Rolling ball video

Materials needed to create this video:


Set up your trough or length of fabric in a sunny or well-lit area.  You can make a trough by placing 2 long parallel pieced of half round wood underneath the fabric.  Alternately, you can use 2 Eva Half Moon Dowels placed parallel underneath the fabric.  Roll the child’s favorite ball slowly down the length of fabric and use the video function on your camera to film the rolling ball moving in slow motion.  Once you have your clip, loop it in iMovie or make it into a GIF (hint: Google, “How to make a GIF on your iPhone).

Food Coloring in a Container of Hand Sanitizer Gel, April 11, 2020

Tips, Tricks, Modifications and Strategies

Phase I Target: Food Coloring in a Container of Hand Sanitizer Gel

April 11, 2020

Creating materials for students with CVI is always fun for me and I often wish I had more time to be creative.  During these days of self-quarantine, I finally have some time to create all of the materials and books that have been on my, “To Do” list.  I will be posting photos of materials, along with tips, tricks, modifications and strategies regarding materials created in the hope that you too will try your hand at making some unique, child-specific materials for your student or child.  When appropriate, I will offer templates and other materials for you to use, to complete the project as well.

For this first post, I will be sharing my interpretation of an idea from the blog titled, ““While You Are Home: Activities For Children With CVI” by Dr. Christine Roman.  Dr. Roman notes that this visual target could be used with a child in Phase I.  You are encouraged to read Dr. Roman’s blog first, so you will better understand how this target might be used.  You can access this blog at Dr. Roman’s website cviresources and at Paths to Literacy;

http://cviresources.com/while-you-are-home/

https://www.pathstoliteracy.org/blog/while-you-are-home-activities-children-cvi


Phase I, Activity 1: Food coloring in a container of hand sanitizer gel

Materials needed to make this target:

  • Clean, empty non-breakable bottle with a lid. I really like using empty Voss water bottles.  They come in either plastic or glass (I only use the plastic).  Clean, empty plastic spice containers also work well.
  • Sanitizer gel (or other clear gel-like substance such as mineral oil, clear hair gel or corn syrup).
  • Food coloring or liquid watercolor also works well (https://amzn.to/39FR9v5 ).
  • A backlit surface such as an APH Lightbox, iPad app (give example) or an LED Light Box Tracer (https://amzn.to/2JDNjZ9 )
  • Optional; reflective, sparkling bits that float in the gel

Remove any labels from the outside of the bottle and clean the inside well.  Fill the bottle with sanitizer gel or other clear gel-like substance, to almost the top.  Top off the bottle with food color.  Add some sparkles or other reflective bits.  Place the top back on the bottle and screw it on tight.  Some people recommend using a bit of super glue to permanently keep the lid on.  Place the colorful bottle on top of a lightbox or other light source and roll it slowly.  Alternately, shine a bright (300 lumens or greater) flashlight through the bottle.  Show it to the child; do not talk or tactually distract the child.  Wait until the child notices the visual target.

For alternate instructions and other options for making this visual target, Google “sensory bottle”.  The website I found most helpful was “Preschool Inspirations” at: https://preschoolinspirations.com/how-to-make-a-perfect-sensory-bottle/

Pictured below, a Sensory Bottle made from a Voss plastic water bottle, filled with mineral oil, colored red with liquid watercolor.  I also included in my Sensory Bottle bits of red glitter, red gel shaped hearts, and red, reflective mylar-like shapes.  When the bottle is slowly rolled, the bits float slowly around.  The Sensory Bottle is illuminated as it placed on top of an ultra-thin, portable, LED light box tracer.

Pictured below, a Sensory Bottle standing in front of an AGPtEK Light Box Tracer.


*Please note: One or more of the links noted on this blog are affiliate links.  This simply means that if you click on a link and make a purchase, I may receive a small commission at NO EXTRA cost to you.  As an Amazon Affiliate, I earn from qualifying purchases.